
How to Hack a Furby

Our Chicago office has a tradition of giving silly but relevant goodbye gifts to departing colleagues. The goal is to make their exit a little more light-hearted for everyone, as well as give our erstwhile colleagues a sort of inside joke to take with them. When a friend and colleague of mine, Aaron Ferber, was leaving to pursue another passion in St. Louis, we started ginning up ideas for his send-off.
We were joking about how Aaron's last name is pretty similar to Furby, the interactive Gremlin look-a-like toy from the late 90s. Someone suggested it would be funny if we modified a Furby so that instead of speaking Furbish (I think that's what people call the language Furbys speak?), it would repeat phrases in Aaron's voice. At first, it was just a joke, but then I mentioned I had a couple Furbys at home I'd been meaning to hack…

What’s a Furby?
For the unfamiliar, Furby was a coveted toy when it hit the market in 1998. Seriously. More than 40 million of the hamster-esque creature were sold in its first three years of production. Kids fell in love with it because of its child-like nature and the fact that it required feeding, nurturing, and constant attention. It also only spoke Furbish out of the box, developing an English vocabulary over time as kids talked to it.
Because the Furby was one of the first widely-marketed toy robots, it also appealed to the hacking community. In the early years, there were some news stories about whether the microphone inside Furby was listening in on private conversations, but thankfully, Furby does not use the microphone to record audio. Because of the ruckus over the microphone, there is a wealth of information on the internet about how to properly deconstruct a Furby, and how the Furby's insides function.
How I did it
The first step was to take Furby apart. Unfortunately, due to Furby's realistic personality, the process of deconstructing the Furby felt more like field dressing an animal. I had to delicately skin the toy so that I would be able to resurrect it later.
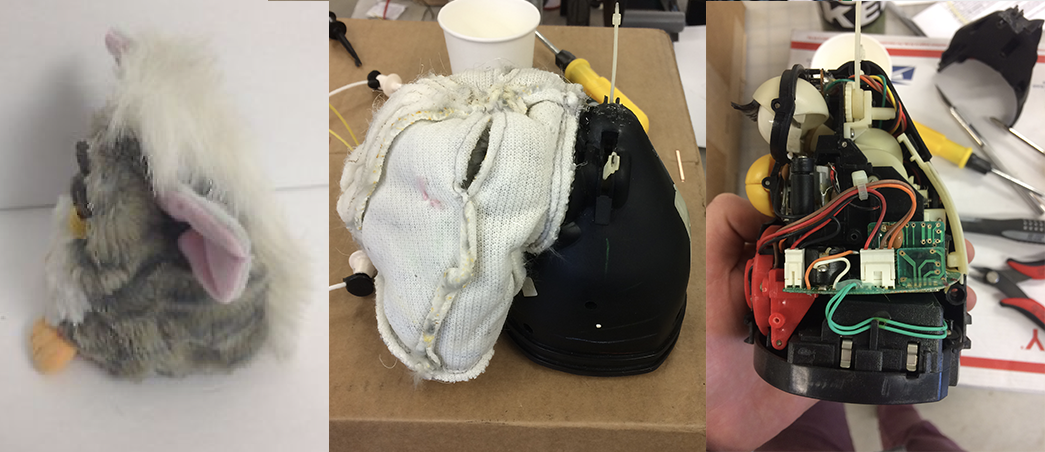
Once the Furby was dissembled I put together a vice to clamp down its skeleton; it almost looked like I was torturing it until it would talk...and in a way, I kind of was. With the Furby in place, I was able to access its inner circuitry and check out its voice box. After some initial probing, I turned back to the internet again and was able to find a full schematic of Furby’s insides, which meant I no longer had to guess and check what each part was used for and how they were connected. I could also disconnect the voice box.
After some reading, I decided that the best option for triggering voice playback would be to use the motors. Furby always moves and talks at the same time, so any time the motors are working, he should be talking. If I used any of its switches (belly, mouth/tongue, gyroscope, etc.) as an audio trigger, I would miss Furby’s unprovoked audio actions, the ones it does without user input. (Sometimes the Furby will start singing or fall asleep on its own.) Those actions are triggered internally, and I didn't have the time or resources to begin understanding how a Furby's brain works.
To build the the audio playback, I used a circuit board I created a few years ago that's a variation of Adafruit's wav/ogg audio fx board. My audio playback board is very similar, but it also includes the necessary circuitry for charging a connected lithium-ion battery. With this addition (and a voltage booster), I was able to power the Furby from a rechargeable source, rather than four AA batteries.

Now that most of the individual pieces were developed, it was time to play Dr. Frankenstein and connect the parts together to give Franken-Furby life.
I used the newly vacant battery holder space to store the Furby’s new guts...err circuitry. This was an ideal location because there were already holes to run new wiring up to the Furby’s body. I added a wire to break out the motor trigger line for monitoring. I was able to monitor the motor with a basic analog comparator (LM311), and use the output to trigger audio playback. I then amplified the audio output with a class D amp, before connecting to the Furby’s speaker with two more wires.
Last, but not least, I added a few clips of Aaron speaking at various events to the audio playback board. We may or may not have have played around with loading some more inappropriate vocals (i.e. creepy laughing and other Halloween-themed sounds) first for kicks, but things got a little too creepy, so that didn’t last long.
The result
We presented the Franken-Furby to Aaron at his goodbye party, and it was a hit! Unfortunately, because it was a goodbye gift, it's no longer possible to work on that Furby anymore. But I’m game to hack more Furbys. My next goal is to create a new version, perhaps integrating all the circuitry onto a single circuit board, and hopefully dig a little deeper into understanding how Furbys operate.


Subscribe to the IDEO newsletter
.jpg)
